| Bookmark Name | Actions |
|---|
Space Reclaim
When large amount of data from the LIVE database are moved into DLM database, storage space occupied by the moved data will be freed in the LIVE database. This section explains you in detail the best practices to be followed for reclaiming the space freed in Oracle and SQL databases and various space reclamation methods.
Depending on the method used, the live database objects can be fragmented as an aftermath of space reclamation. This section does not include steps to explain the methods for defragmenting the live database objects. You should measure the fragmentation before and after the space reclaim and work on the defragmentation to ensure a good performance.
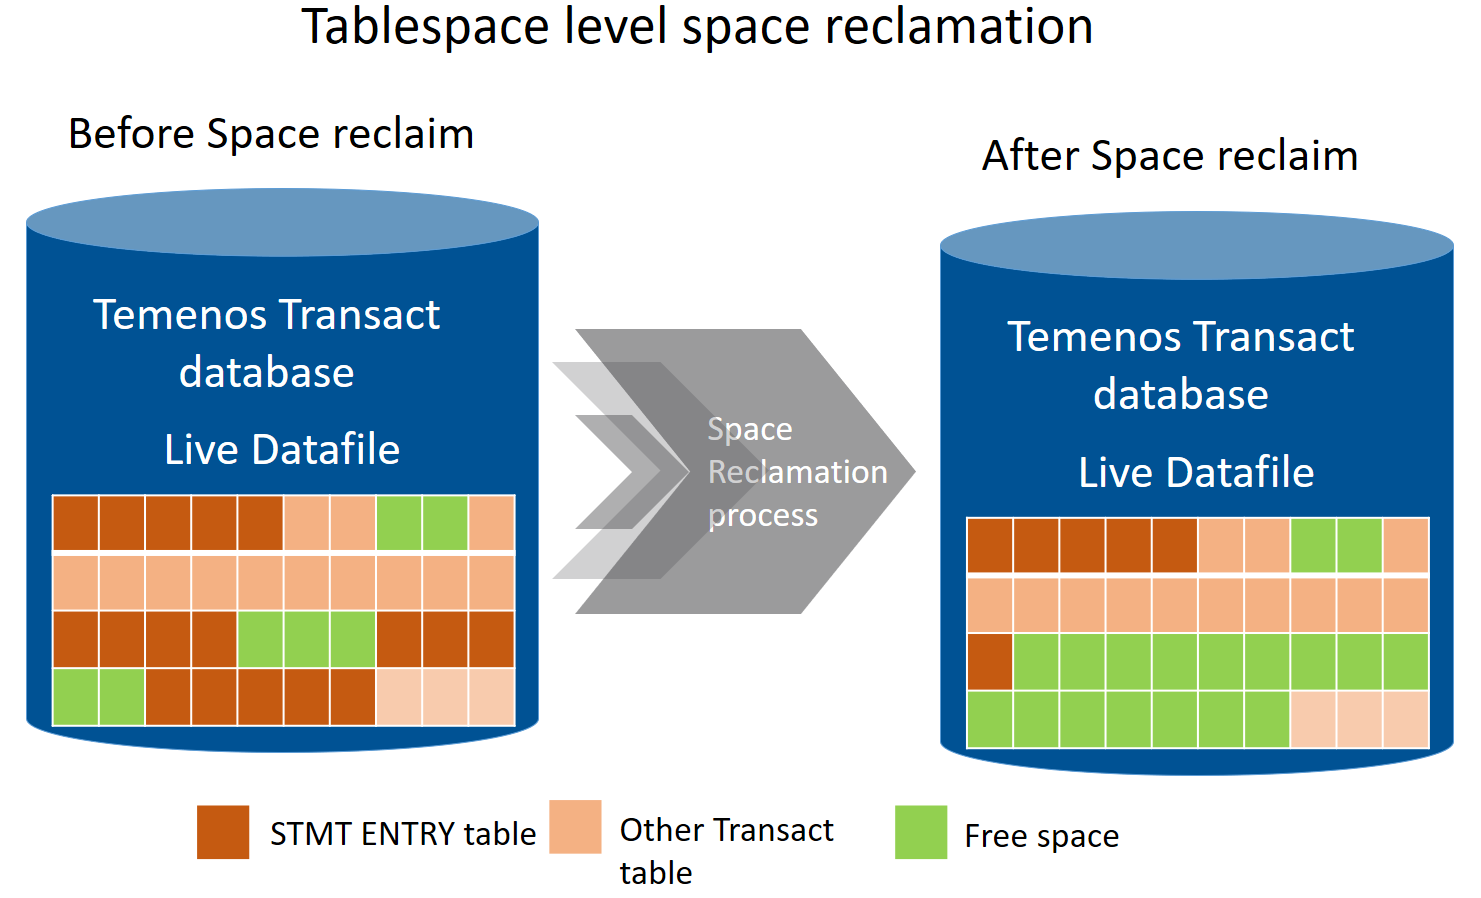
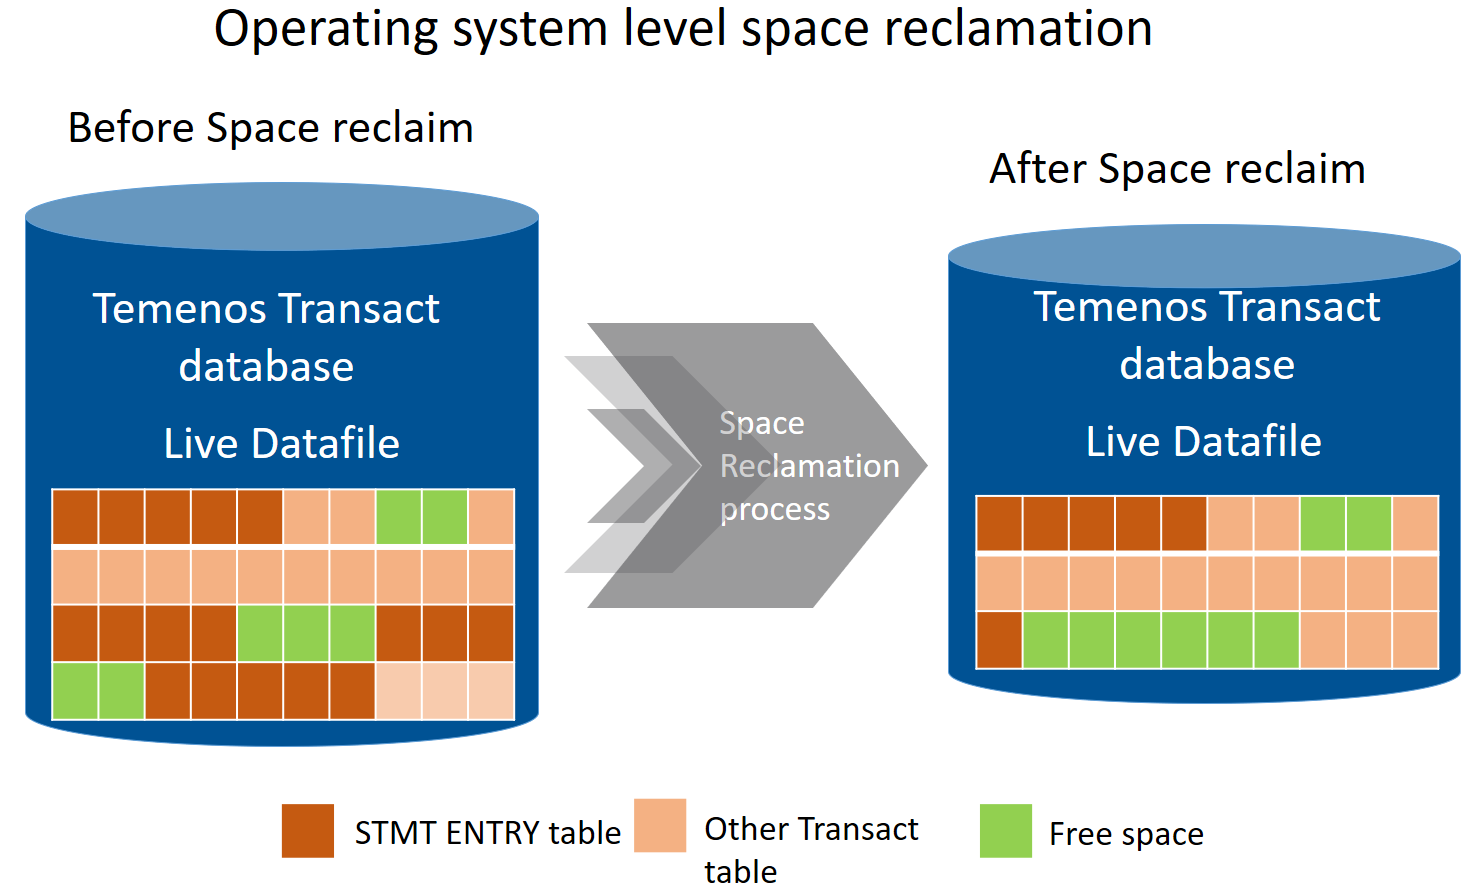
The following example shows how the space is available in the Temenos Transact data files after the STMT_ENTRY data is moved into the Data Lifecycle Management database. After the data is moved from the Temenos Transact LIVE database to DLM database, that data gets deleted from the LIVE database.
The legend values for the example illustrations are:
The following illustrations show the Temenos Transact LIVE tablespace before and after the deletion of the STMT_ENTRY table, respectively.


NOTE: There are multiple solutions available in the market to reclaim space. The suggested methods are tested and recommended by Temenos. You can also use your own method to reclaim the space available in the LIVE database, if required.
Modes of Space Reclaim
You can reclaim space in using either offline or online mode.
In offline mode, you:
- Need to plan for a downtime of the database during space reclamation process.
- Can claim the maximum amount of space
In this mode, database fragmentation can be kept to minimal.
In online mode, you:
- Need not plan for a downtime of the database as space reclamation process requires minimal or no downtime in this mode
- Can schedule more tasks to regain the space while the online transaction processing (OLTP) is slow and still running
- Cannot claim the maximum amount of space
In this mode, database fragmentation is more compared to the offline mode.
Space Reclaim Approach
This section explains the steps involved in the space reclamation process and suggests few alternatives that you can choose based on your business requirements.
Initially, you need to identify the list of tables, which have the space to be reclaimed. This process uses Temenos Transact VOC to identify the DLM tables, which are deleted after the data movement in the LIVE database. The two approaches for space reclamation are as follows.
- The space reclaimed can be made available back to the same tablespace. When this approach is taken, the space released is available for the future database growth and database need not allocate space for the future growth until all the free space is utilized. You need to check for the fragmentation of the database objects after a space reclamation process.
- The space reclaimed from the tablespace can be given back to the operating system, thus making the database size smaller. In this approach, the space is freed up in the tablespace and released to the operating system. This reduces the current free space available in the tablespace. A side effect of this approach is that the database need to allocate further space when new data is inserted.
The space reclaim approaches for the various databases are as follows.
High-water mark (HWM) starts at the first block of a newly created table. As data is placed into the table over time and more blocks get used, HWM rises. If some or all rows in the table are deleted, there may be many blocks that no longer contain data, but they are still under the HWM, and you can reclaim space at the table level with these techniques, all of which lower the HWM for the table, thereby marking the space as unused.
You will get the required access to run the below suggested commands after the required methodology to reclaim space is completed and you need to work on the narrowed down methodology.
As the first step, you need to identify the list of table names that had underwent this DLM process from VOC by searching for a $RO string and register it in temporary tables. This list has to be joined with the metadata tables, filtering the tables that hold the maximum amount of free space.
select
table_name ,round((blocks*8),2) "size (kb)" ,
round((num_rows*avg_row_len/1024),2) "actual_data (kb)",
(round((blocks*8),2) - round((num_rows*avg_row_len/1024),2)) "wasted_space (kb)",
DECODE(round((blocks*8),2),0,0,(((round((blocks*8),2) - round((num_rows*avg_row_len/1024),2))/round((blocks*8),2))*100)) "fragmentation(%)"
from
dba_tables
WHERE TABLE_NAME IN (SELECT DISTINCT
(CASE
WHEN table_name like '%#ARC' THEN SUBSTR(table_name, 0, LENGTH(table_name) + 1 - 5)
WHEN table_name like '%#RO' THEN SUBSTR(table_name, 0, LENGTH(table_name) + 1 - 4)
END) table_name
FROM USER_TABLES@RO;) AND
DECODE(round((blocks*8),2),0,0,(((round((blocks*8),2) - round((num_rows*avg_row_len/1024),2))/round((blocks*8),2))*100))> =30;
The above query considers all the tables, which have more than 30% fragmentation. You can determine this number based on your requirement. This query gives you the used, actual allocated and unused space with fragmentation percentage for every table.
The following are the space reclamation options available for this database.
This command moves rows down into the unused space and adjusts only HWM but not the segment extent and table size remains the same. This syntax also preserves the index and constraint definitions.
ALTER TABLE <table name> MOVE;
NOTE: This command runs online in Oracle version 12.2 and above but runs only offline for Oracle version 12.1 and below.
The following table lists the advantage and disadvantage of this command.
| Advantage | Disadvantage |
|---|---|
|
The data from a table can be moved to either the same or another tablespace. This allows the table to use the already available space in the tablespace if the table is moved within the same tablespace. |
The indexes become unavailable if the data movement is in offline mode. The indexes need to be rebuilt and you should plan for this activity. |
This command re-packs the rows, moves down HWM, and releases the unused extents.
ALTER TABLE <table name> ENABLE ROW MOVEMENT;
ALTER TABLE <table name> SHRINK SPACE;
This approach releases space from the tablespace into the operating system, thus making the database smaller.
The following table lists the advantages and disadvantages of this command.
| Advantages | Disadvantages |
|---|---|
|
Segment shrink is an online, in-place operation, reclaims unused space both above and below the high water mark and does not require extra disk space allocation. |
Concurrent Data Manipulation Language (DML) operation is blocked for a short time at the end of the shrink operation, when the space is deallocated. |
|
Indexes are maintained during the shrink operation and remain usable after the operation is complete. |
|
The dbms_redefinition package enables you to use parallel CREATE TABLE AS SELECT (CTAS) to reorganise tables, while the tables continue to accept updates.
GRANT EXECUTE ON DBMS_REDEFINITION TO <USER_NAME>;
The following command increases the parallelism for the redefinition to improve the performance of the redefinition.
ALTER SESSIONS FORCE PARALLEL DML PARALLEL <N> ;
ALTER SESSION FORCE PARALLEL QUERY PARALLEL <N> ;
The following command starts the redefinition process.
EXEC DBMS_REDEFINITION.CAN_REDEF_TABLE(<SOURCE_TABLE_NAME>, 2); -- 2=rowid
EXEC DBMS_REDEFINITION.START_REDEF_TABLE(<SOURCE_TABLE_NAME>, <INTERM_TABLE_NAME>, NULL, 2);
EXEC DBMS_REDEFINITION.FINISH_REDEF_TABLE((<SOURCE_TABLE_NAME>, <INTERM_TABLE_NAME>,);
This approach releases the space back to the tablespace.
NOTE: This command runs online in Oracle version 12.2 and above but runs only offline for Oracle version 12.1 and below.
After you have reclaimed space at tablespace level, you can reclaim the space physically by resizing the data files, which have free space.
You can use the below query to identify the current datafile size for a specific tablespace.
SELECT B.TABLESPACE_NAME,
B.FILE_NAME,
ROUND (B.BYTES / 1024 / 1024 / 1024, 2) "SIZE GB",
ROUND (B.MAXBYTES / 1024 / 1024 / 1024, 2) "MAX SIZE GB",
ROUND (SUM (A.BYTES) / 1024 / 1024 / 1024, 2) "FREE SPACE GB",
CASE
WHEN MAXBYTES = 0
THEN
ROUND (SUM (A.BYTES) / 1024 / 1024 / 1024, 2)
ELSE
ROUND (
( (B.MAXBYTES - B.BYTES) + SUM (A.BYTES)) / 1024 / 1024 / 1024, 2)
END
"TOTAL FREE SPACE GB"
FROM DBA_FREE_SPACE A, DBA_DATA_FILES B
WHERE A.FILE_ID = B.FILE_ID AND B.TABLESPACE_NAME IN (<Tablespace Name>)
GROUP BY B.TABLESPACE_NAME,
B.FILE_NAME,
B.BYTES,
B.MAXBYTES
ORDER BY 1, 2;
You can use the below query to resize the data files to claim the space physically.
ALTER DATABASE DATAFILE ‘<DATAFILE_NAME>’ RESIZE <REQUIRED_SIZE>;
This approach releases the space back to the operating system, thus reducing the database size.
The following table lists the advantages and disadvantages of this command.
| Advantage | Disadvantage |
|---|---|
|
Manually reducing the sizes of datafiles enables you to reclaim unused space in the database. |
It is not always possible to decrease the size of a file to a specific value. It could be that the file contains data beyond the specified decreased size, in which case the database returns an error. |
The steps required to reclaim space in the SQL server database are as follows:
You can use the following query to extract the list of tables and their associated free space available.
SELECT
t.name AS TableName,
i.name AS indexName
into #FreePageslist
FROM sys.tables t
INNER JOIN TAFJ_VOC VOC ON t.NAME = VOC.ORCLFILENAME
INNER JOIN sys.indexes i ON t.OBJECT_ID = i.object_id
INNER JOIN sys.partitions p ON i.object_id = p.OBJECT_ID AND i.index_id = p.index_id
INNER JOIN sys.allocation_units a ON p.partition_id = a.container_id
WHERE t.name NOT LIKE 'dt%' AND i.OBJECT_ID > 255
AND i.index_id <= 1 AND VOC.ASSOCIATED IS NOT NULL
GROUP BY t.name, i.name
HAVING SUM(a.total_pages) - SUM(a.used_pages) > 18;
You can use the following query to get the current space available at the filegroup level.
with file_cte as (
select
name,physical_name,
size_mb = convert(decimal(11, 2), size * 8.0 / 1024),
space_used_mb = convert(decimal(11, 2), fileproperty(name, 'spaceused') * 8.0 /1024)
from sys.database_files )
select
name,
physical_name,
size_mb,
space_used_mb,
free_space_mb = size_mb - space_used_mb,
space_used_percent = convert(decimal(5, 2), space_used_mb / size_mb * 100),
The amount of free space left in the filegroup is derived and the bank DBA has to take a call on what threshold to be maintained to limit the amount of free space left. As the database keeps growing, it is not advisable to claim the complete free space.
The following are the space reclamation options available for this database.
Before initiating the Shrink File process, DBA has to confirm that the database backup is available for restoration, in case of any error during the shrink file process.
When SHRINKFILE with NOTRUNCATE is issued to the database, the SQL server performs the shrink operation in such a way that it moves pages from the end of the data file towards the beginning, where some free unallocated space is found. The main difference is that the data file itself is not shrunk. This means that the unused space at the end of the data file is not reclaimed back in the file system. The physical size of the data file is the same as before the operation. These result in free space available at the end of the data file and index fragmentation that is introduced.
When SHRINKFILE with TRUNCATEONLY is issued to the database, SQL server truncates the data file from the end towards the beginning as long as you have some free unallocated space at the end of the data file. With this option, the SQL server does not move any page within the data file and hence there is no chance of fragmentation. This ensures that there is some free space available at the end of your data file, for TRUNCATEONLY to reclaim some space to the operating system.
DBCC SHRINKFILE (N'<<datafilename>>', <<targetsize>>, TRUNCATEONLY)
DataFileName/DataFileId : To get from sys.database_files
TargetSize : Calculate the target size leaving free space percentage
TargetSize = SpaceUsed+SpaceUsed*@TargetPercent/100.0 where @TargetPercent can be 10%, which is recommendable to bekept as threshold value
You can interrupt the SHRINK operation any time and continue it later. It is recommended to perform the operation on an offline database, if possible. By interrupting and continuing, you can gain the same size like that of the offline mode.
The following table lists the advantage and disadvantage of this option.
| Advantages | Disadvantages |
|---|---|
|
Helps you to claim the space in the file group level with the database still being online for transaction |
Running a regular shrink operation is not directly related to the performance and can cause adverse fragmentation problems |
|
Releases space back to the operating system, thus reducing the database size |
Occurs with some maintenance plans that rebuilds all indexes and runs a shrink to remove the extra space necessary for the index rebuilds – completely undoing the effects of the index rebuild |
This option enables you to move all the tables that had just underwent into archival process. This reduces the original filegroup size and maintains the recently constructed new filegroup with re-organised data and indexes.
As the first step, you need to find out more details about the table you want to move by executing the following T-SQL.
sp_help N'<<your table name>>
If a table has a clustered index, the index is ideally the table data. Therefore, if you move the clustered index, you also move your data.
To move the index, you need to make a note of the index_name and index_keys shown in the results of the above help query, and use them to fill in the <<blanks>> in the following query:
CREATE UNIQUE CLUSTERED INDEX [<<name of clustered index>>]
ON [<<table name>>]([<<column name the index is on - from index_keys above>>])
WITH DROP_EXISTING, ONLINE
ON <<name of file group we want to move the index to>>
To move a heap table, you need to add a clustered index to it, run the above statement to move it to a different filegroup, and drop the index. After manually verifying the content of the filegroup with the archived tables, you need to do a REORG using the following T-SQL.
SELECT OBJECT_NAME( i."id" ) AS TableName ,
i."Name" AS IndexName ,
FILEGROUP_NAME( i.groupid ) AS FileGroupName
FROM sysindexes AS i
WHERE ( i.indid IN ( 0 , 1 ) Or i.indid < 255 ) And -- Tables & indexes only
OBJECTPROPERTY( i."id" , 'IsUserTable' ) = 1 And -- User tables only
OBJECTPROPERTY( i."id" , 'IsMSShipped' ) = 0 And -- No system tables
COALESCE( INDEXPROPERTY( i."id" , i."Name" , 'IsStatistics' ) , 0 ) = 0 And -- No Statistics / Auto-Create stats
COALESCE( INDEXPROPERTY( i."id" , i."Name" , 'IsHypothetical' ) , 0 ) = 0 -- No Hypothetical statistics
ORDER BY FileGroupName , TableName , IndexName
The following table lists the advantage and disadvantage of this command.
| Advantages | Disadvantages |
|---|---|
|
The space in the original filegroup is released back to the filegroup and can be used by the database for further growth. |
If the table has a LOB_DATA (varbinary (max) data type) allocation unit in the filegroup, then this method does not move the LOB_DATA to the new filegroup (only the IN_ROW_DATA and ROW_OVERFLOW_DATA allocation units are moved when a clustered index is re-created in a different filegroup). |
|
|
It needs to be considered that REORG increases the size of the log file. |
Fragmentation Handling
This section provides details about fragmentation handling for different databases.
When data is modified in a database, the database and its indexes become fragmented. As indexes become fragmented, ordered data retrieval becomes less and reduces database performance. You need to identify the table names with the below query and its corresponding indexes for which the fragmentation level is higher than 30%.
The following code is a sample query to identify fragmentation.
select
table_name ,round((blocks*8),2) "size (kb)" ,
round((num_rows*avg_row_len/1024),2) "actual_data (kb)",
(round((blocks*8),2) - round((num_rows*avg_row_len/1024),2)) "wasted_space (kb)",
DECODE(round((blocks*8),2),0,0,(((round((blocks*8),2) - round((num_rows*avg_row_len/1024),2))/round((blocks*8),2))*100)) "fragmentation(%)"
from
dba_tables
WHERE DECODE(round((blocks*8),2),0,0,(((round((blocks*8),2) - round((num_rows*avg_row_len/1024),2))/round((blocks*8),2))*100))> =30;
When the fragmentation is higher than 30% or user-defined, one of following methods can be used for defragmentation.
This approach proves to be the most efficient in defragmenting the tables, which are highly fragmented.
EXEC DBMS_REDEFINITION.CAN_REDEF_TABLE(<SOURCE_TABLE_NAME>, 2); -- 2=rowid
EXEC DBMS_REDEFINITION.START_REDEF_TABLE(<SOURCE_TABLE_NAME>, <INTERM_TABLE_NAME>, NULL, 2);
EXEC DBMS_REDEFINITION.FINISH_REDEF_TABLE((<SOURCE_TABLE_NAME>, <INTERM_TABLE_NAME>,);
This approach is the fastest in both the space reclaim modes. The percentage of fragmentation is highly reduced in this method as well.
ALTER TABLE <table name> MOVE;
This approach is highly expensive on the time and defragmentation of tables as required.
ALTER TABLE <table name> ENABLE ROW MOVEMENT;
ALTER TABLE <table name> SHRINK SPACE;
When data is modified in a database, the database and its indexes become fragmented. As indexes become fragmented, ordered data retrieval becomes less and reduces database performance. You need to identify the table names with the below query and its corresponding indexes for which the fragmentation level is higher than 30%.
The following code is a sample query to identify fragmentation.
SELECT B.name AS TableName , C.name AS IndexName , C.fill_factor AS IndexFillFactor
, D.rows AS RowsCount, A.avg_fragmentation_in_percent
, A.page_count FROM sys.dm_db_index_physical_stats(DB_ID(),NULL,NULL,NULL,NULL) A
INNER JOIN sys.objects B ON A.object_id = B.object_id
INNER JOIN sys.indexes C ON B.object_id = C.object_id AND A.index_id = C.index_id
INNER JOIN sys.partitions D ON B.object_id = D.object_id AND A.index_id = D.index_id
WHERE C.index_id > 0 ORDER BY 5 DESC
The heavily fragmented indexes need a rebuild process. Otherwise, index reorganization should be sufficient. The Microsoft recommended standards are listed in the following table.
| Reference Values (in %) | Action | SQL statement |
|---|---|---|
|
avg_fragmentation_in_percent > 5 AND < 30 |
Reorganize Index |
ALTER INDEX REORGANIZE |
|
avg_fragmentation_in_percent > 30 |
Rebuild Index |
ALTER INDEX REBUILD |
In online mode, the new index is built while the old index is accessible to reads and writes. Any update on the old index also is applied to the new index. An antimatter column is used to track possible conflicts between the updates and rebuild (that is, delete of a row, which was not yet copied). When the process is completed, the table is locked for a brief period and new index replaces the old index. If the index contains LOB columns, online operations are not supported in the SQL Server 2005/2008/R2.
ALTER INDEX <INDEX NAME> ON <TABLE NAME> REBUILD WITH (
ONLINE = ON (WAIT_AT_LOW_PRIORITY (MAX_DURATION = 1 MINUTES, ABORT_AFTER_WAIT = SELF)) , ALLOW_ROW_LOCKS = ON , ALLOW_PAGE_LOCKS = ON , MAXDOP = 1 );
In offline mode, the table is locked upfront for any read or write and the new index is built from the old index, while holding a lock on the table. Read or write operation is not permitted on the table while the index is being rebuilt. Only when the operation is done, the lock on the table is released and read and write are allowed again.
ALTER INDEX <INDEX NAME> ON <TABLE NAME> REBUILD;
The key points about the modes are:
- Offline index rebuild is faster than ONLINE rebuild.
- Extra disk space required during SQL Server online index rebuilds.
- SQL Server locks acquired with SQL Server online index rebuilds.
The REORG SQL command runs through the leaf level of the index, reorganizing the indexes according to the current volume of data in a table to apply any previously set fillfactor settings. This operation is always online, and if it is cancelled then it just stops where it is and does not involve a giant operation to rollback. It removes fragmentation without increasing data file size.
ALTER INDEX <INDEX NAME> ON <TABLE NAME > REORGANIZE WITH ( LOB_COMPACTION = ON )
Add Bookmark
save your best linksView Bookmarks
Visit your best links BACK
BACK


Are you sure you want to log-off?