


| Bookmark Name | Actions |
|---|
ClearBank API Gateway Installation Guide
This document aims at explaining the installation procedures required to install the ClearBank Inbound & ClearBank Outbound Camel WAR file for the payments and accounts development. The scope of the document is to cover the deployment of the bar file of the ClearBank Inbound and Outbound flow.
System Requirements
The following are the pre-requisites for installing this package.
- Jdk 1.8.
- Active MQ 5.19+.
- TPH necessary setup for processing the PACS and CAMT xml.
General Considerations
The Temenos firewall restricts the incoming request coming from ClearBank and thus the POC was tested in DMZ machine outside the Temenos network.
The TPH queue name mentioned in the below ClearBank_InboundPayment and ClearBank_Outbound WAR files is defaulted to the one that were used during the development of the POC. The queue name should be changed or configured to the TPH internal queue name available in the TPH area.
For ClearBank_InboundAccount WAR file, the new queue has to be created by modifying the standalone-utp.xml file and the same queue has to be associated with the IF exit point for the newly created Aacount application version.
It is assumed that the necessary information like URL name, certificate name, etc are already updated in the ClearBank simulation environment.
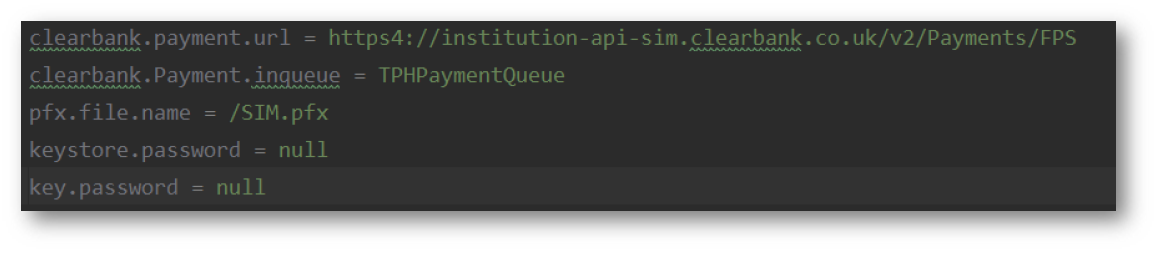
The Inqueue name is named TPHPaymentQueue by default at the time of the development. This queue message will be picked up by ClearBank_InboundPayment war file to sent the same to ClearBank.
- To change the default queue name and Clearbank Request URL, the config.properties file of the ClearBank_InboundPayment WAR can be modified.

- Make sure the correct Temenos PFX file containing the private key is inside the classpath of the war file: path-to-war-file\ClearBank_InboundPayment.war\WEB-INF\classes\.

The Inqueue name is named T24AccountQueue by default, since it was used at the time of development of POC. This queue message will be picked up by ClearBank_InboundAccount WAR file to sent the same to ClearBank.
- To change the default queue name and Clearbank Request URL, the config.properties file of the ClearBank_InboundAccount WAR can be modified.

- Make sure the correct Temenos PFX file containing private key is inside the classpath of WAR file: path-to-war-file\ClearBank_InboundAccount.war\WEB-INF\classes\.
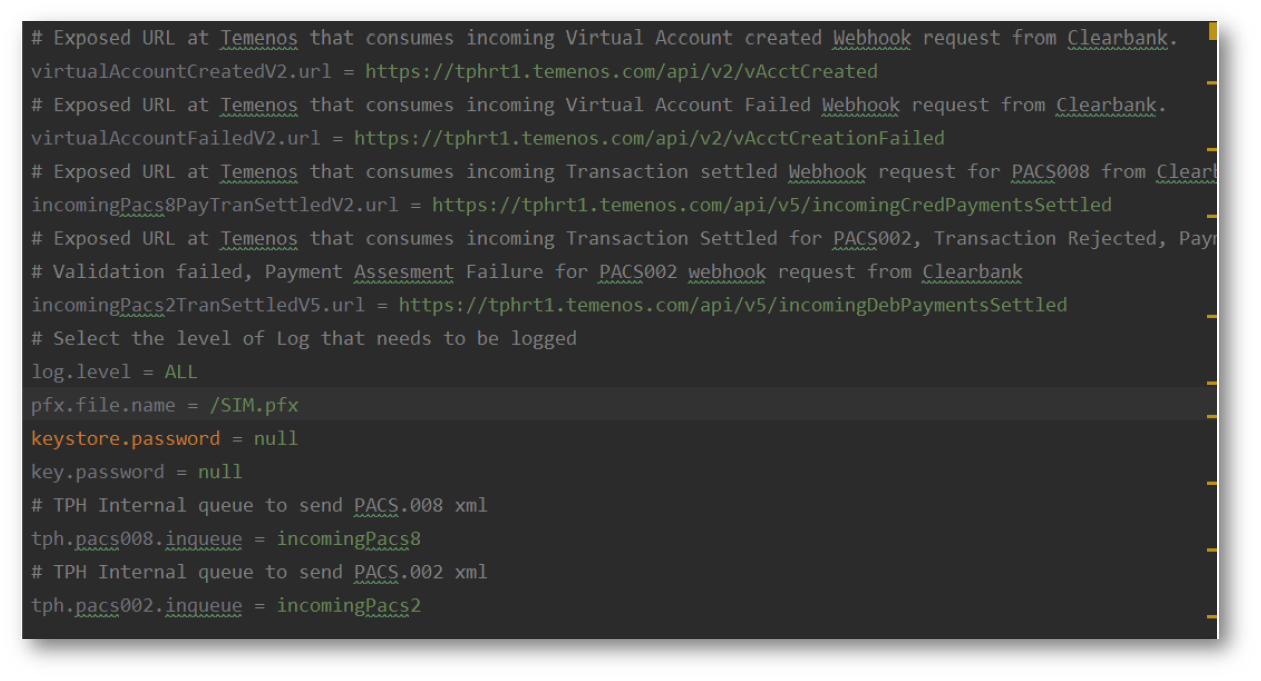
The TPH Internal Inqueue name for PACS.008 is named incomingPacs8 and for PACS.002 named incomingPacs2 by default. These are the Inqueue which will receive message from ClearBank_Outbound WAR file flow and TPH will process the message from these queues.
The ClearBank_Outbound WAR file will expose 4 different HTTPS URL to be exposed to ClearBank.
The details of which property is set to what URL service exposed is given in the config.properties file.
- To change the default queue name and Temenos Exposed URL, the config.properties file of the ClearBank_Outbound WAR can be modified.

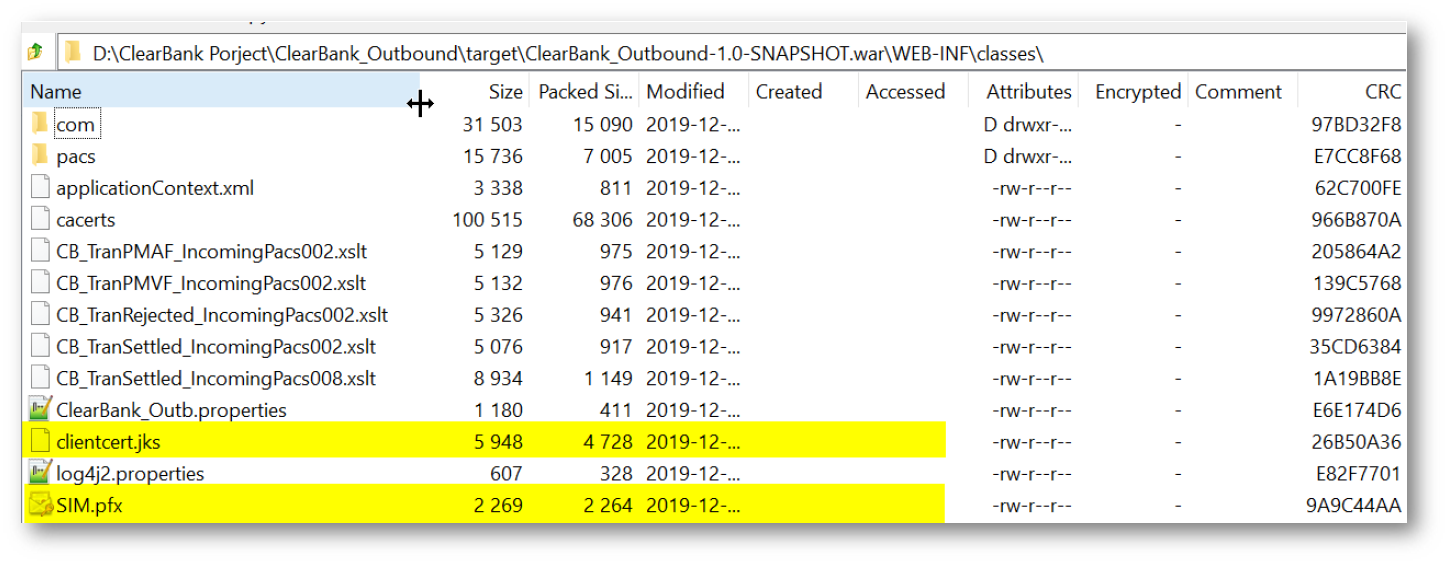
- Make sure the correct Temenos PFX file containing private key and Keystore for HTTPS connectivity is inside the classpath of WAR file: path-to-war-file\ClearBank_Outbound.war\WEB-INF\classes\.

Contents of the Package
CAMEL war components:
- ClearBank_InboundPayment.war.
- ClearBank_InboundAccount.war.
- ClearBank_Outbound.war.
Steps for Deploying the Bar File
Follow the steps below to deploy the bar file.
Design time configuration steps for ClearBank_InboundAccount WAR.
- A new account application version needs to be created.
- The Exit points must be created for the newly created version.
- The Temenos Transact Internal JMS queue has to be defined in the IF.INTEGRATION.SERVICE.PARAM application.
- The queue has to be configured in standalone-utp.xml of the Temenos Transact area.
- Once a new record is committed the Temenos Transact internal JMS queue will get populated with the necessary account details, which will be processed by Exposed API.
- Navigate to the applicationContext.xml file of the Packaged ClearBank Inbound and outbound WAR file. Path: path-to-war-file\WEB-INF\classes\.

- Update the Jboss Active MQ environment property as per server.
Bar file deployment:
- Open the JBOSS Standalone deployment folder.
- Drop the ClearBank_Outbound.war, ClearBank_InboundPayment.war and ClearBank_InboundAccounts.war files in the deployment directory of the JBOSS.
Configuring the System
- Commands to generate CSR and PFX with Public and private key that can be used in the simulation environment:
- # generate a dummy certificate authority openssl genrsa -out CA.key 2048 openssl req -new -x509 -key CA.key -out CA.crt -subj /CN=CA.
- # generate the simulation key and CSR (CSR it the thing you need to upload to ClearBank, so they will know about your public key) openssl genrsa -out SIM.key 2048 openssl req -new -sha256 -key SIM.key -out SIM.csr -subj /CN=SIM.
- # Create CRT and PFX files openssl x509 -req -in SIM.csr -CA CA.crt -CAkey CA.key -CAcreateserial -out SIM.crt openssl pkcs12 -export -out SIM.pfx -inkey SIM.key -in SIM.crt
- Import the CA certificate provided by Security team in PFX to Keystore JKS format for HTTPS connectivity.
- # Generate PEM file from PFX file openssl pkcs12 -in mypfxfile.pfx -out mypemfile.pem
- #Generate P12 format file from PEM file openssl pkcs12 -export -in mypemfile.pem -out mykeystore.p12 -name "MyCert"
- # Check the certificate inside the P12 file keytool -v -list -keystore mykeystore.p12 -storetype pkcs12
- # Import the P12 and certifictaes in Keystore file keytool -importkeystore -srckeystore mykeystore.p12 -destkeystore clientcert.jks -srcstoretype pkcs12 -deststoretype JKS
Add Bookmark
save your best linksView Bookmark
Visit your best links BACK
BACK


Are you sure you want to log-off?