


| Bookmark Name | Actions |
|---|
Adding a New Field to an Existing Module
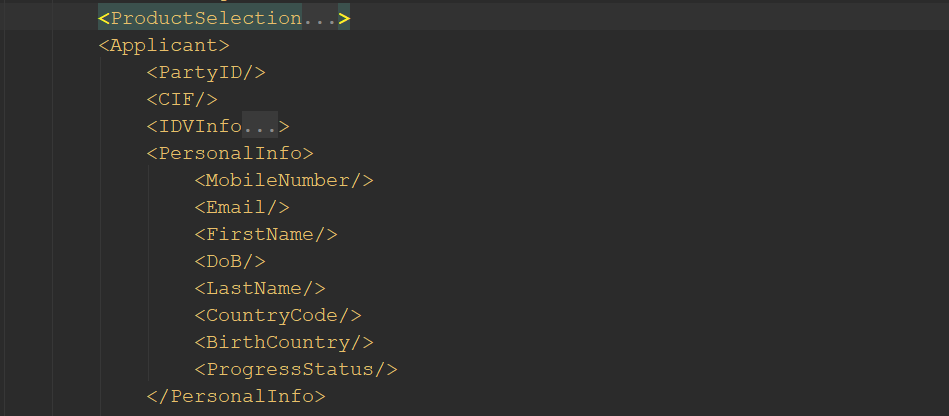
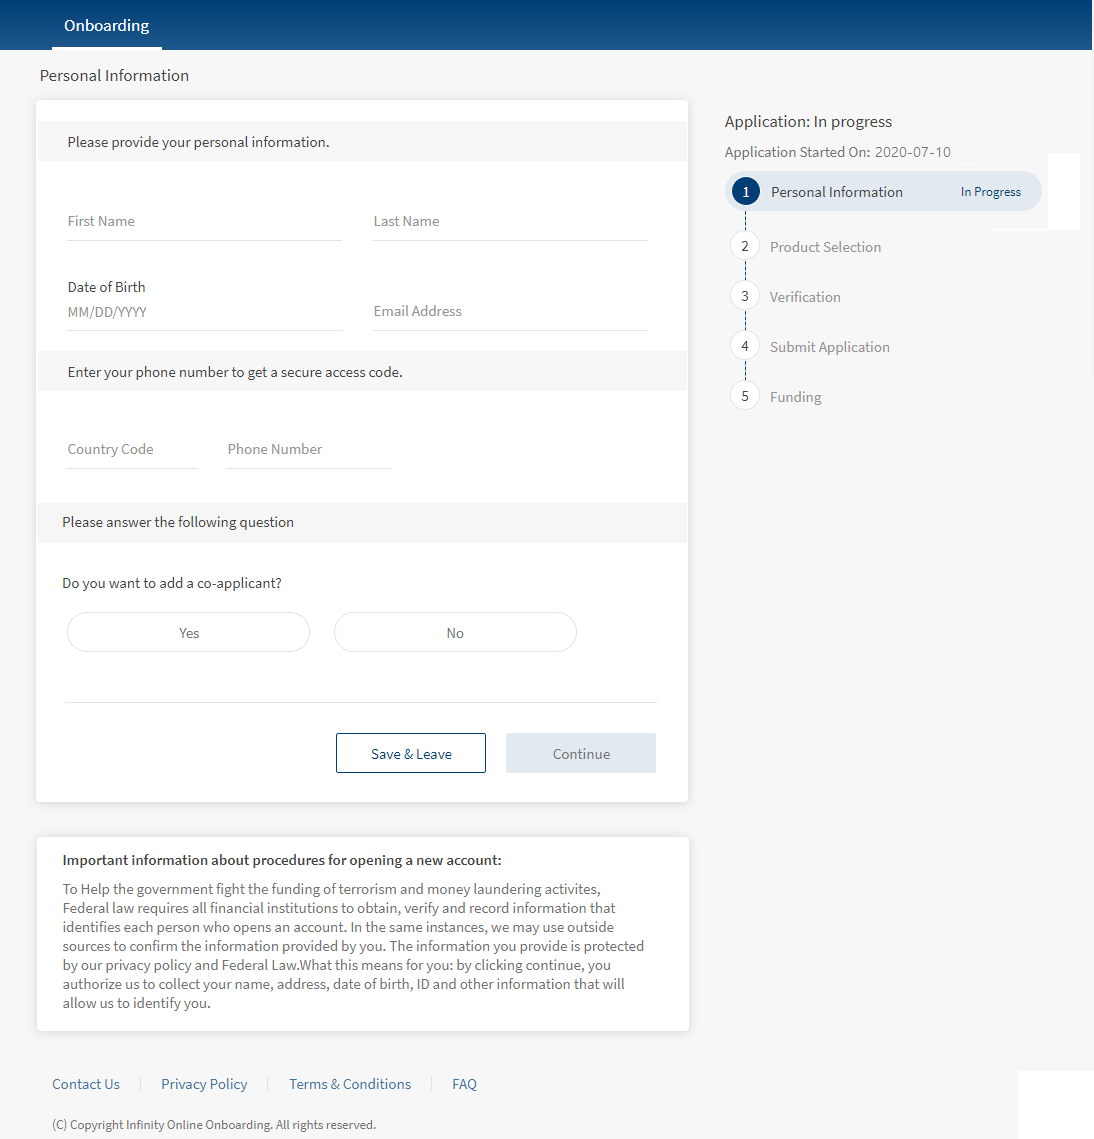
This doc explains how to add a new field to an existing module. Consider that the core system/Transact has an additional field named Birth Country that you want to add to the Personal Information module of the Onboarding journey. Currently, the Personal Info section is as follows.
You must make the following changes to add a field for Birth Country in the Personal Information module.
NOTE:
- As the Birth Country field is already available in Transact, you need not configure the DBX DB.
- The aforementioned changes are sufficient for the Applicant and Co-Applicant sections.
Client Application Extensions
This section provides information about the client-side changes that are required to add the Birth Country field to the Personal Information module. Client Application Extensions involve configuring the following elements:
UI/UX Modifications:
UI/UX modifications represent the changes that are required to enable the Birth Country field. As the UI is non-extensible, you must update the required forms directly. In this case, you have to create a new entry in the form that is associated with the Personal Information section. To do so, make the following configurations in the Infinity Onboarding Visualizer project.
- Go to Project Explorer > Forms. Open the form that is used for the Personal Information section.
Consider that you want to add the Birth Country field after the Email Address field. To do so, you must modify the component that is linked to the Personal Information section. In this case, the personal information section uses thecom.nuo.UserInformationcomponent. - Go to Templates and search for the
com.nuo.UserInformationcomponent, and add a new flex row for birth country below the UI element of email address. - In the Action Editor, configure the Flex fields for this flex row.
- After configuring the Flex fields, insert the
com.loans.AnimatedTextBoxcomponent into the flex row that you added and rename it as atbxBirthCountry. - Open the lblAnimatedKA label and configure the following fields in the Action Editor:
- Change the value of the Text field to Birth Country.
- Map the respective i18n key in the Text i18n Key field.
NOTE: The layout of the screens is created by the designers of the implementation team. Based on the layout design, the developers of the implementation team configure the layout properties.
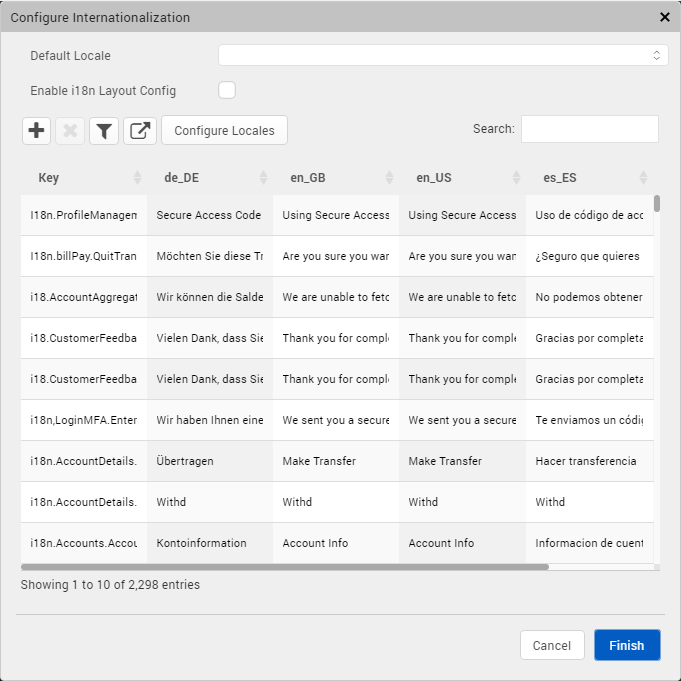
To add i18n keys for the birth country field, follow these steps.
- From the main menu, go to Edit > Internationalization. The Configure Internationalization screen appears.

- Click the plus (+) button. A new key is added.
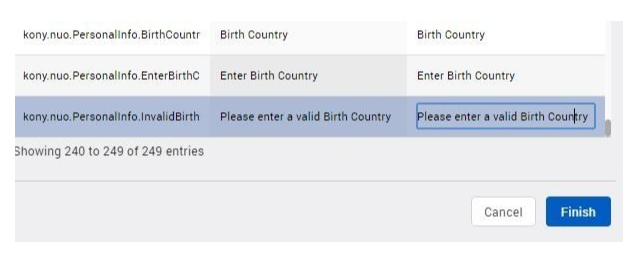
- Add the required i18n keys as follows.

These keys are used in the code as follows.
kony.i18n.getLocalizedString("kony.nuo.PersonalInfo.InvalidBirthCountry")
Form Controller Extension
To make a change in a form, you cannot directly modify the code in the Form Controller. You must create a Form Controller Extension and modify the code as required. A Form Controller Extension is required to validate the new fields. It includes operations such as the addition of a JSON payload, fetching the back-end response, and mapping the error modules.
To create a form controller extension in the Infinity Onboarding Visualizer project, follow these steps.
- In the Project explorer, expand the Modules section.
- Right-click the require tab, and then select New Require module. A new JS file is created.
- Rename the new JS file to
PersonalInfoControllerExtn. - Define the functions that are required for the Birth Country field in the
PersonalInfoControllerExtnfile. The functions are as follows.- resetfocus()
resetFocus: function() { this.super('resetFocus', []); this.view.UserInformation.atbcBirthCountry.tbxAnimatedKA.onEndEditing(); } - resetSkin()
resetSkins: function () { this.super('resetSkins',[]); this.view.UserInformation.lblError2.setVisibility(false); this.view.UserInformation.atbxBirthCountry.flxUnderlineKA.skin = applicationManager.getConfigurationManager().getConfigurationValue("underlineSkin"); } - setDefaultValues()
setDefaultValues: function() { this.super('setDefaultValues', []); this.view.UserInformation.tbxAnimatedKA.text = ''; } - getPersonalinfoPayload()
getPersonalinfoPayload: function() { var extPayload = this.super('getPersonalinfoPayload', []); extPayload.BirthCountry = this.view.UserInformation.atbxBirthCountry.tbxAnimatedKA.text; return extPayload; } - populatePersonalInfo()
populatePersonalInfo: function(personalInfo) { this.super('populatePersonalInfo', [personalInfo]); this.view.UserInformation.atbxBirthCountry.tbxAnimatedKA.text = personalInfo.BirthCountry; this.resetFocus(); } - populatePartyResponse()
populatePartyResponse: function(personalInfo) { this.super('populatePartyResponse', personalInfo); this.view.UserInformation.atbxBirthCountry.tbxAnimatedKA.text = personalInfo.BirthCountry; } - populateScannedData()
populateScannedData: function(data) {
    this.super('populateScannedData', [data]);
    this.view.UserInformation.atbxBirthCountry.tbxAnimatedKA.text = "";
}
- resetfocus()
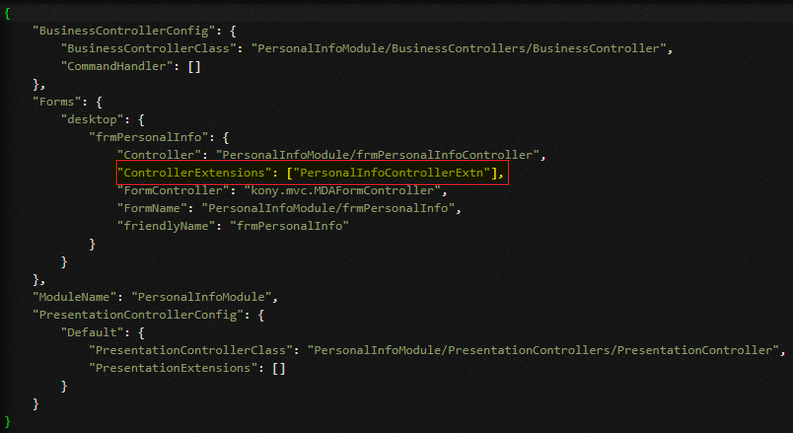
- After you define the functions, link the new extension file to your ModuleConfig file of the Personal Information module. To do so, go to Project > Reference Architecture Extensions > PersonalInfoModule > Config > ModuleConfig.
Add the following code to the Forms method:"ControllerExtensions": ["PersonalInfoControllerExtn"]

Data Validation
After you add a new field, you can define certain rules that are specific to the Birth Country field. For example, if the name of your birth country supports only 10 characters and you enter an 11-character word, the app should throw an error. These details must be defined in the Spotlight app and Form Controller Extension. To do so, follow these steps.
- Open the Spotlight app.
- From the left pane, select System Configurations. The System Configurations page appears.
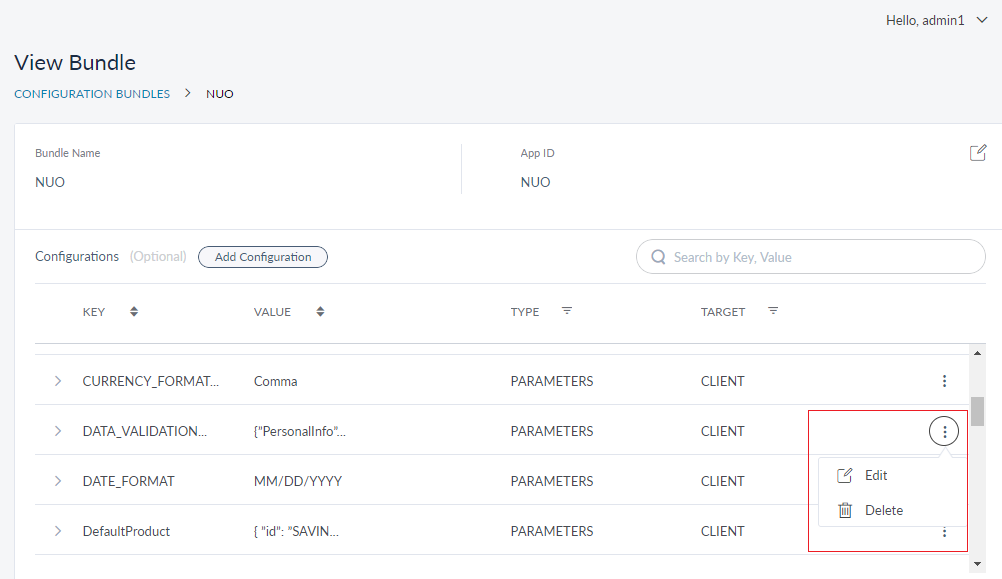
- Open the Infinity Onboarding bundle named NUO Bundle. The View Bundle page appears that contains the details of the Infinity Onboarding keys.

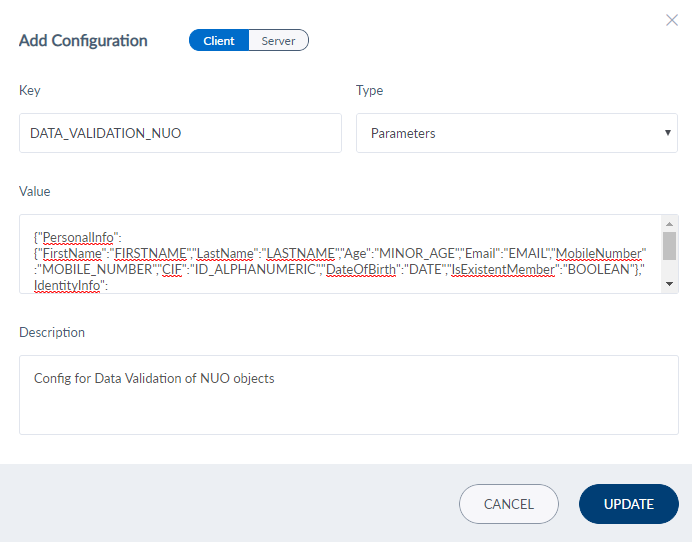
- Search for the DATA_VALIDATION_NUO key and select Edit from the contextual menu. The Add Configuration window appears.

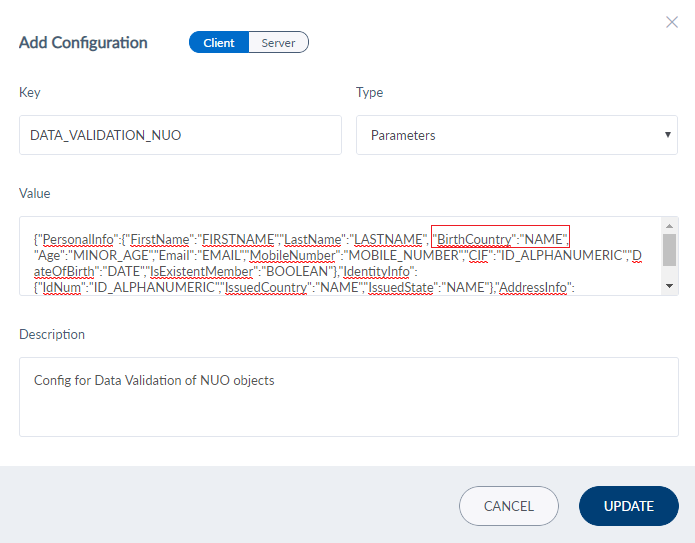
- In the Value field, add the Birth Country field along with the validation rule and click Update.

- After updating the DATA_VALIDATION_NUO key, click Update in the View Bundle page.
For more information about adding configurations in the Spotlight app, click here.
The DATA_VALIDATION_NUO is as follows.
{
    "PersonalInfo": {
        "FirstName": "FIRSTNAME",
        "LastName": "LASTNAME",
        "Age": "MINOR_AGE",
        "Email": "EMAIL",
        "MobileNumber": "MOBILE_NUMBER",
        "BirthCountry": "NAME",
        "CIF": "ID_ALPHANUMERIC",
        "DateOfBirth": "DATE",
        "IsExistentMember": "BOOLEAN"
    },
    "IdentityInfo": {
        "IdNum": "ID_ALPHANUMERIC"
    },
    "AddressInfo": {
        "Country": "NAME",
        "State": "NAME",
        "Zipcode": "ZIPCODE"
    }
}
NOTE: The NAME rule is used as an example for validating the Birth Country field. In the Spotlight app, each field can be associated with either a rule from the common rule set or a custom rule. To create or use the rules for data validation, refer to Data Validation.
- After configuring the Infinity Onboarding Bundle in the Spotlight app, you must define the following functions in the Form Controller Extension (PersonalInfoControllerExtn) that you created.
- Error scenario for the Birth Country field
showWidgetErrors: function(response) {
    this.super('showWidgetErrors', [response]);
    for (var key in response) {
        if (response[key] !== "") {
            if (key === "BirthCountry") {
                this.view.UserInformation.atbxBirthCountry.flxUnderlineKA.skin = applicationManager.getConfigurationManager().getConfigurationValue("underlineErrorSkin");
                section2Err = response.BirthCountry;
                this.view.UserInformation.lblError2.setVisibility(true);
                this.view.UserInformation.lblError2.text = section2Err;
            }
        }
    }
Map the underlineErrorSkin skin to flxUnderlineKA in the error scenario. The error is displayed in the lblError2 label. - As the Birth Country is a mandatory field, you must define the necessary field validations. To do so, define the following functions in the Form Controller of the Personal Information module.
These functions map the underlineErrorSkin skin to flxUnderlineKA in error scenario and disable the Continue button if the Birth Country field is empty.initActions: function() { this.super('initActions', []); this.view.UserInformation.atbxBirthCountry.tbxAnimatedKA.onKeyUp = this.onBirthCountryTextChange.bind(this); }, onBirthCountryTextChange: function() { //called by initActions() if (this.view.UserInformation.atbxBirthCountry.tbxAnimatedKA.text.trim() != "") { this.view.UserInformation.atbxBirthCountry.flxUnderlineKA.skin = applicationManager.getConfigurationManager().getConfigurationValue("underlineSkin"); } this.changeContinueButtonState(); }, isPersonalInformationValid: function() { // called by this.changeContinueButtonState() var isvalid = this.super('isPersonalInformationValid', []); var birthCountry = this.view.UserInformation.atbxBirthCountry.tbxAnimatedKA.text.trim() === "" ? false : true; return isvalid && birthCountry; }
- Error scenario for the Birth Country field
Server-side Extensions
This section provides information about the server-side changes that are required to add the Birth Country field to the Personal Information module.
After you create and configure new fields on the client-side, you must configure the server-side implementations to bind the UI elements with the back-end data. This involves configuring the following elements:
Java Integration Service
This section explains how to extend the existing data transfer objects to add a new field. This facilitates storing the new data in the back end.
IMPORTANT: Before configuring Java Integration Service, ensure to set up an IDE and configure the server-side code.
In the case of adding the Birth Country field, you must configure the java services for the following projects:
Onboarding
To modify the Onboarding Java Service, follow these steps.
- Open your Eclipse project.
- Create a new maven project.
- Add the base Infinity Onboarding Java Project project as a dependency in the pom.xml file.
<project xmlns="http://maven.apache.org/POM/4.0.0" xmlns:xsi="http://www.w3.org/2001/XMLSchema-instance" xsi:schemaLocation="http://maven.apache.org/POM/4.0.0 https://maven.apache.org/xsd/maven-4.0.0.xsd">
  <modelVersion>4.0.0</modelVersion>
  <groupId>com.temenos</groupId>
  <artifactId>OnBoardingServicesImpl</artifactId>
  <name>OnBoardingServicesImpl</name>

  <dependencies>
		<dependency>
			<groupId>com.temenos</groupId>
			<artifactId>OnBoardingServices</artifactId>
			<version>0.0.1</version>
		</dependency>
  </dependencies>

</project>
- To add new fields, extend the functionality of the DTO named personalInfoDTO in com.temenos.onboarding.extn.dto. To do so, create a new class named
PersonalInfoDTOExtn.java.package com.temenos.onboarding.extn.dto; import com.temenos.onboarding.dto.PersonalInfoDTO; import com.fasterxml.jackson.annotation.JsonIgnoreProperties; import com.fasterxml.jackson.annotation.JsonInclude; import com.fasterxml.jackson.annotation.JsonInclude.Include; @JsonIgnoreProperties(ignoreUnknown = true) @JsonInclude(value = Include.NON_NULL) public class PersonalInfoDTOExtn extends PersonalInfoDTO { private static final long serialVersionUID = -5256207912161885043L; private String birthCountry; public String getBirthCountry() { return birthCountry; } public void setBirthCountry(String birthCountry) { this.birthCountry = birthCountry; } } - To add a new parameter in jsonDtoMapping, extend the business delegate functionality. In this case, extend JMbusinessDelegateImpl. To do so, create a new class named
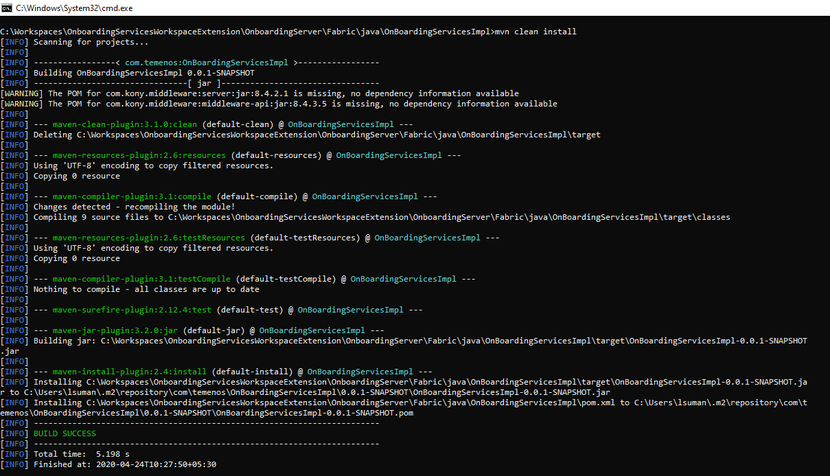
JMBusinessDelegateImplExtn.java.package com.temenos.onboarding.extn.businessdelegate.impl; public class JMBusinessDelegateImplExtn extends JMBusinessDelegateImpl{ public JMBusinessDelegateImplExtn() { super.jsonDtoMapping.put("birthCountry", "BirthCountry"); } - Build the jar by using the maven commands.

DbpLocalServices
To create a party and a core customer record, you must configure the Fabric queue system. To store the new entries in the Party microservice or Core system, you must extend the DbpLocalServices project.
NOTE: The extensibility for the Party microservice is enabled, by default. In the Party microservice, the product APIs support storage and retrieval of the extension data along with the product data. To do so, the product API payload contains the extension data JSON.
The POST/PUT APIs are used to create/update the extension data along with the product data whereas the GET API is used to retrieve the extension data.
To extend the DbpLocalServices project, follow these steps.
- Open your Eclipse project.
- Create a new maven project and add the DbpLocalServices project as a dependency.
- To add a new field, you must extend the Customer DTO functionality by creating a new class named
CustomerDTOExtn.javaas follows.package com.temenos.extn.dbx.product.dto; import com.fasterxml.jackson.annotation.JsonIgnoreProperties; import com.fasterxml.jackson.annotation.JsonInclude; import com.fasterxml.jackson.annotation.JsonInclude.Include; @JsonIgnoreProperties(ignoreUnknown = true) @JsonInclude(value = Include.NON_NULL) public class CustomerDTOExtn { private static final long serialVersionUID = -5256207912161885043L; private String birthCountry; public String getBirthCountry() { return birthCountry; } public void setBirthCountry(String birthCountry) { this.birthCountry = birthCountry; } } - Extend the functionality of the buildCustomerDto method of CustomerUtils that is invoked from the Resource layer. To do so, create a new class named
CustomerUtilsExtn.java.public static CustomerDTO buildCustomerDTO(String customerID, Map<String, String> inputParamMap, DataControllerRequest dcRequest) { CustomerDTOExtn customerDTO = super.buildCustomerDTO(String customerID, Map<String, String> inputParamMap, DataControllerRequest dcRequest); CustomerDTOExtn.setBirthCountry(dcRequest.getParameter("BirthCountry")); } - Extend the functionality of the buildPartyDTO method that is invoked from the Business Delegate. To do so, create a new class named
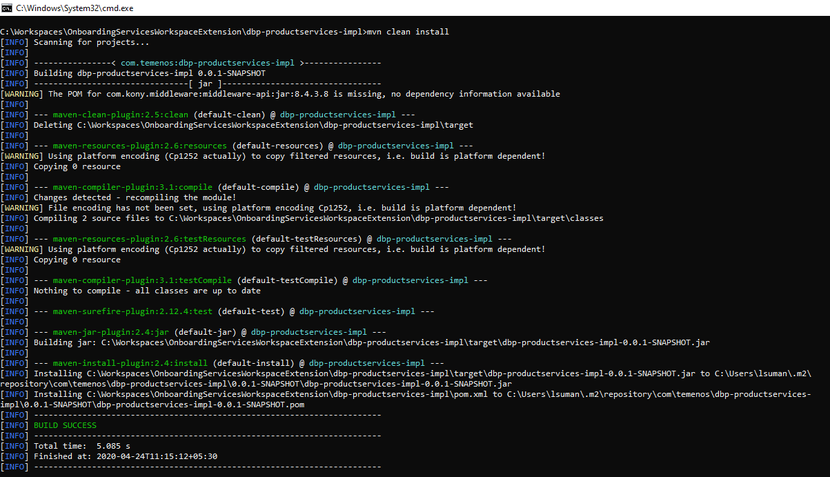
CustomerUtilsExtn.java.public static PartyDTO buildPartyDTO(CustomerDTO customerDTO, PartyDTO partyDTO) { PartyDTO partyData = super.buildPartyDTO(CustomerDTO customerDTO, PartyDTO partyDTO); PartyNames names = partyData.getPartyNames(); names.setExtensionData(customerDTO.getBirthCountry); partyData.setPartyNames(customerDTO.getirthCountry); return partyData } - Build the jar by using the maven commands.

Experience API Changes in Quantum Fabric
For the Birth Country field to work, you must create the back-end data in Quantum Fabric and link it to the front-end data. To do so, follow these steps.
- Sign in to your Quantum Fabric Console. The Applications page opens.
- Open the InfinityOnBoarding app from the Applications page.
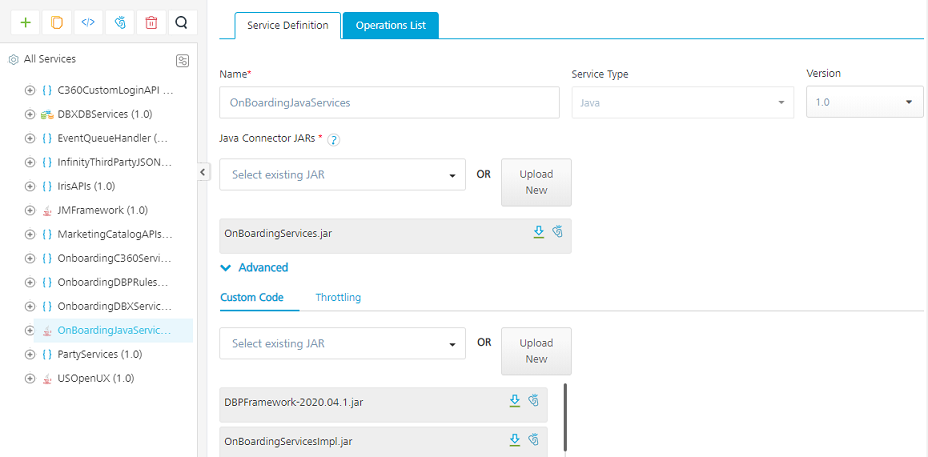
- In the Integration tab, go to the OnboardingJavaServices service definition.
- Expand the Advanced section. In the Custom Code tab, click Upload New and add the java service that you configured for the Onboarding project.
This java service extends the available jar package and binds the new java service as an extended package. It also overrides the existing jar file operations.
- Add the BirthCountry field as a request parameter to the applicable operations. For example, createApplicant operation.
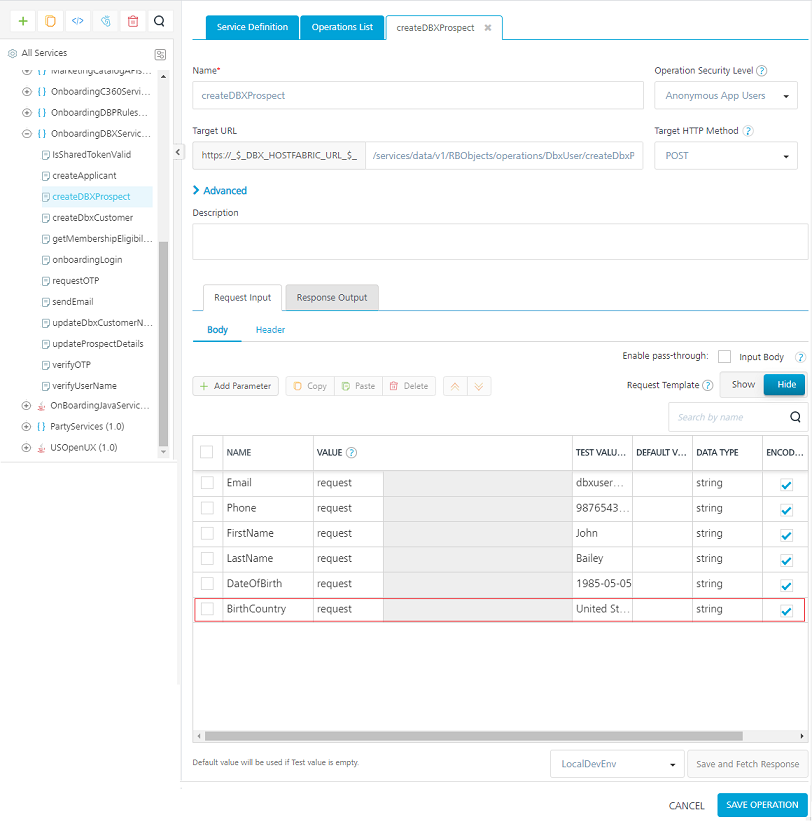
- Go to the OnboardingDBXServices service definition and open the createDBXProspect operation.
- Under the Request Input section, add the BirthCountry field as a request parameter.

- After adding the request parameter, open the Objects tab, go to the PersonalInfo object model and add the Birth Country entry under Fields.
- Save the changes and publish the application.
- After publishing the application, test the service from the Console.
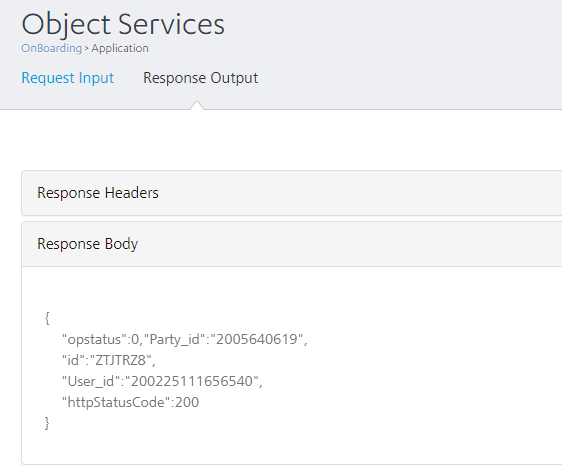
Sample Request Payload
{
"Application_id" : "2D5SRWW",
"ApplicantType" : "Applicant",
"FirstName" : "Something",
"LastName" : "Another",
"Email" : "sad@sac.com",
"DateOfBirth" : "1990-10-10",
"MobileCountryCode" : "+91",
"BirthCountry" : "India"
}
Sample Response Output

Journey Manager Data

Journey Manager
After you implement the client application and server-side extensions, you must extend the Journey Manager functionality.
IMPORTANT: Ensure you meet the conditions mentioned in the Prerequisites section.
To extend the Journey Manager functionality, you must perform the following tasks:
- Updating the Form XML in the Journey Manager Application
- Updating the PDF Receipt
- Updating Workspace Tiles/Cards
- Updating Unit Tests
Updating the Form XML in the Journey Manager Application
To update the form XML data in the Journey Manager application with the birth country field, follow these steps.
- Start the IDE and open the Infinity Journey Manager Application for the Onboarding project.
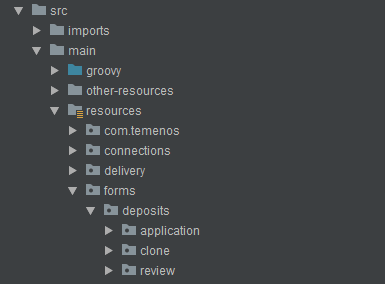
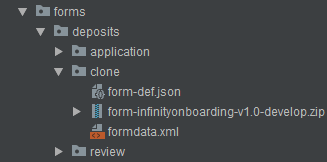
- In the IDE, go to src/main/resources/forms/deposits and locate the
form.xmlfile in the application and clone folders.

The form.xml file contains the XML definition.
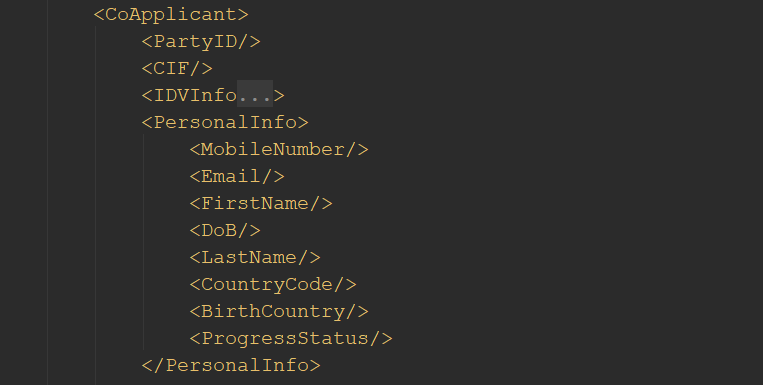
- Edit the XML file and add the new field with an appropriate tag name in the applicant and co-applicant sections. In this case, add the <BirthCountry/> entry as follows.
- For the applicant, add the <BirthCountry/> entry under the AvokaSmartForm/Application/Applicant/ Xpath.
- For co-applicant, add the <BirthCountry/> entry under the AvokaSmartForm/Application/CoApplicant/ Xpath.

- For the applicant, add the <BirthCountry/> entry under the AvokaSmartForm/Application/Applicant/ Xpath.
- In a similar way, add an entry for the Birth Country field in the formdata.xml file of the Clone form.

Updating the PDF Receipt
To build and create receipts by using the Temenos Maestro design tool, refer to Journey Maestro.
Updating Workspace Tiles/Cards
To display the birth country field that you added to the Journey Manager application, you must perform the following tasks in the Workspaces.
Application Data Look-up and Templates
To add the Birth Country field, you must update the look-up data and the templates of the applicant and co-applicant. To do so, follow these steps.
- Open the Journey Manager project for Infinity Onboarding.
- In the IDE, go to src/main/resources/forms/deposits/application and make the following configurations:
- Open the
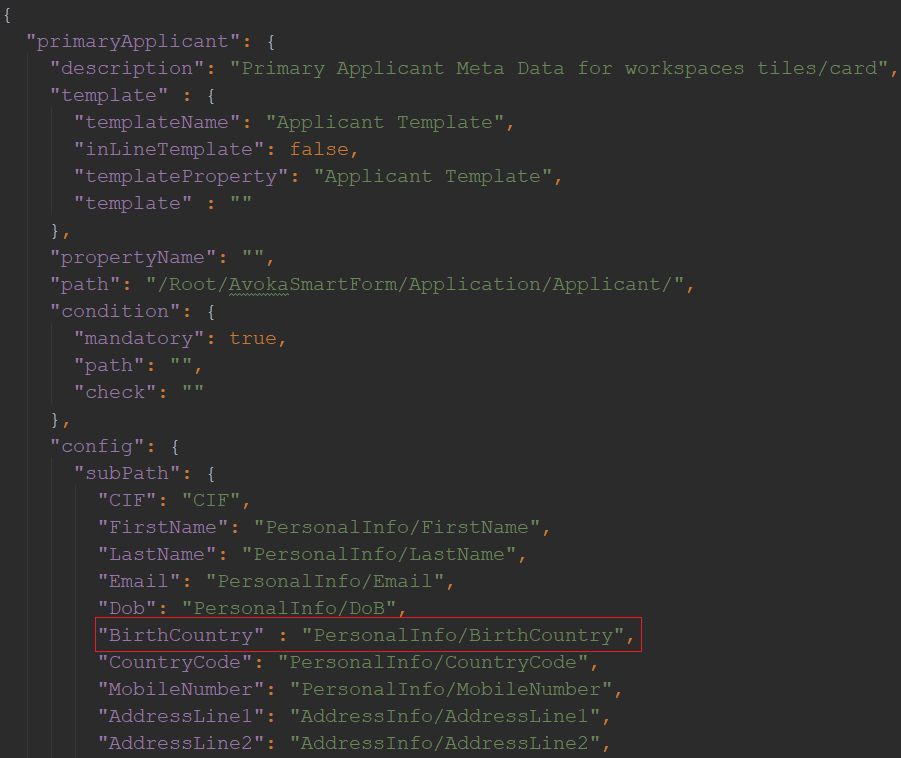
MetaDataConfiguration.jsonfile, under primaryApplicant, search for the subPath section. Add an entry for the Birth Country field in the subPath section.
BirthCountry is the key and PersonalInfo/BirthCountry is the value of the partial Xpath.
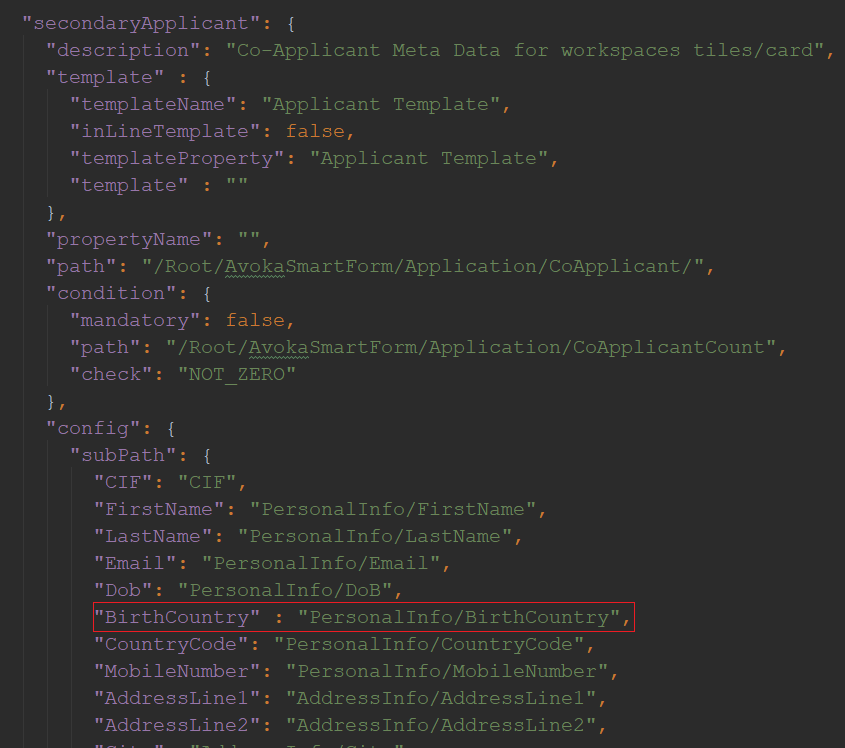
- Similarly, under secondaryApplicant, search for the Sub Xpath section, and add an entry for the Birth Country field.

BirthCountry is the key and PersonalInfo/BirthCountry is the value of the partial Xpath.
- Open the
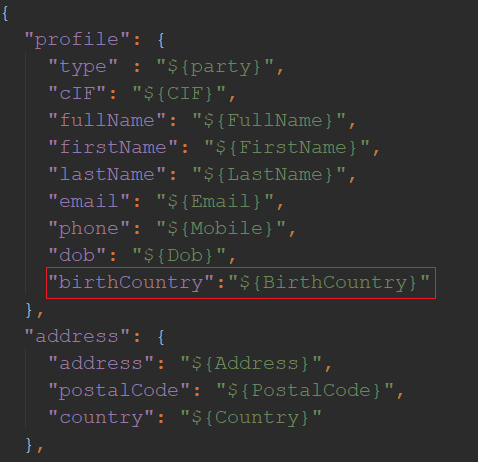
ApplicantTemplate.jsonfile, search for the profile section, and add an entry for the Birth Country field.The
ApplicantTemplate.jsonis updated because it relates to the templateProperty value in the primaryApplicant and secondaryApplicant sections.
- Open the
Workspaces Global Configuration and Spaces
To add the Birth Country field, you must update the cached workspaces. To update the cached workspaces, you can use the existing tiles and cards. To do so, follow these steps.
- Open the Journey Manager project for Infinity Onboarding.
- In the IDE, go to src/main/other-resources/spaces/properties.

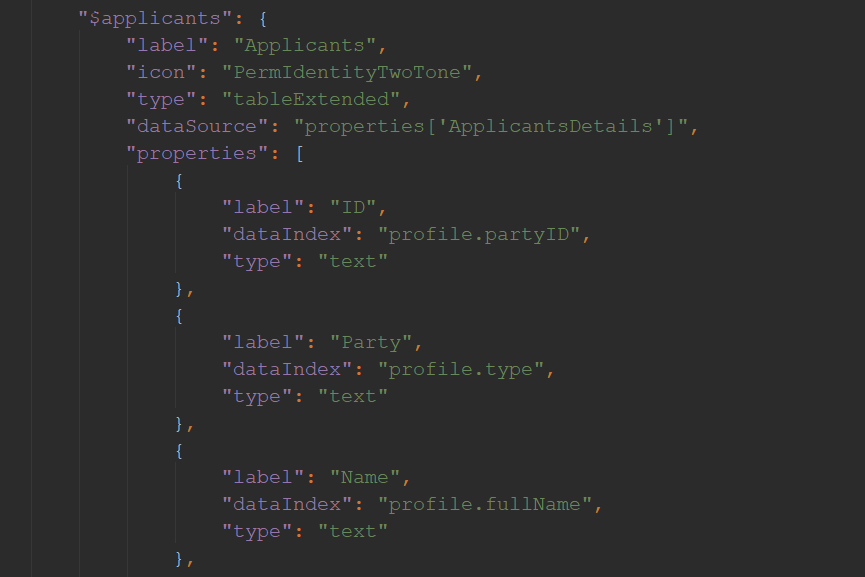
- Open the global.json file and search for the applicant's data by using the $applicants tag.

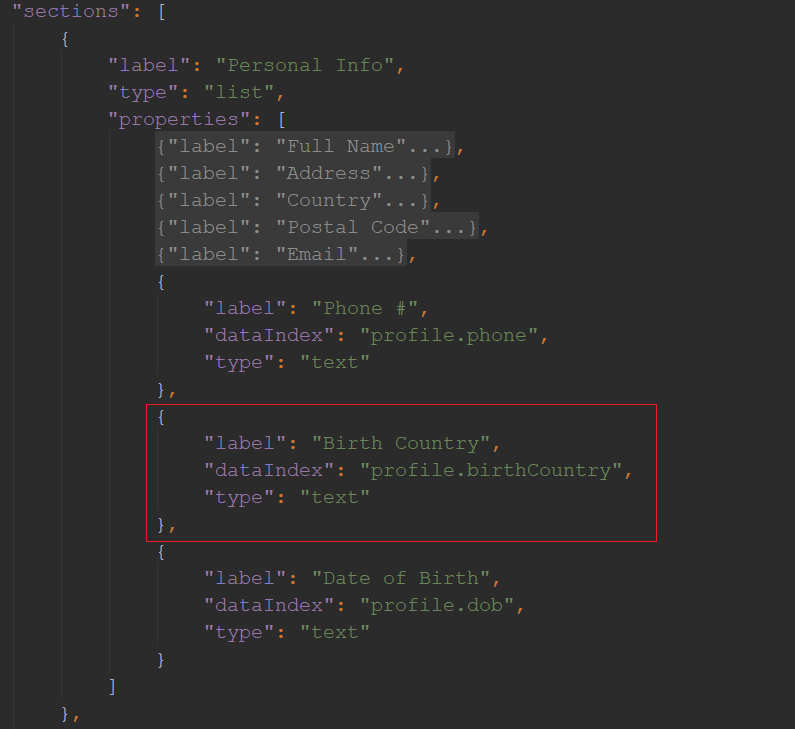
- In the $applicants function, search for the sections array and add the following code for the Birth Country field at the required place.
{
	"label": "Birth Country",
	"dataIndex": "profile.birthCountry",
	"type": "text"
},
For more information about Journey Manager Workspaces, click here. and for more information about the development guides, click here.
Updating Unit Tests
To automate the build process of CD/CI and complete the validation of earlier mentioned changes, you must configure the test data. To update and review the test data, follow these steps.
- Open the Journey Manager project for Infinity Onboarding.
- In the IDE, go to src/test/resources/com/temenos/ioj/bnk/job/action/meta.
- For the following files, make the changes that were mentioned for Application Data Look-up and Templates.
- ApplicantTemplate.json
- MetaDataConfiguration.json
- Review the test data of the XML file by updating the XML form. To do so, add the Birth Country field as required in the following files:
- single-test-data.xml
- joint-test-data.xml
- noprods-test-data.xml
- single-test-bad-data.xml
Make the following changes in the
single-test-data.xml,noprods-test-data.xml, andsingle-test-bad-data.xmlfiles.- Under the AvokaSmartForm/Application/Applicant/PersonalInfo path, add the <BirthCountry>Birth Country</BirthCountry> node.
- Under the AvokaSmartForm/Application/Applicant/CoApplicant/PersonalInfo path, add an empty node, namely, <BirthCountry/>.
Make the following changes in the
joint-test-data.xmlfile.- Under the AvokaSmartForm/Application/Applicant/PersonalInfo path, add the <BirthCountry>Birth Country</BirthCountry> node.
- Under the AvokaSmartForm/Application/Applicant/CoApplicant/PersonalInfo, add the <BirthCountry>Birth Country</BirthCountry> node.
- Go to test/groovy/com/temenos/ioj/bnk/job/action/meta and add additional test cases as desired to the WorkSpaceMetaDataTest.groovy file such as a test for Birth Country present/not present. After updating the WorkSpaceMetaDataTest.groovy file, you can test and validate these changes, if required.
Add Bookmark
save your best linksView Bookmarks
Visit your best links BACK
BACK


Are you sure you want to log-off?